Pop Art Food – Clay Cupcakes

Clay Cupcake Lesson

Claes Oldenburg, Pop Art, Sculpture

Artist Bio and Installations

Pop Art is big and colorful. 

First, students make the bottom of the cupcake. It may be useful to use silicone cupcake liners that are re-usable. They make a pinch pot and then press it into the mold. Turn it upside down to peel the flexible mold back! A perfectly sized cupcake bottom that is realistic in size.
 These cupcakes are actually little dishes kids can keep things inside, so you want the cup part to stay hollow.  Next, students start on the top of the cupcake. They make a small pancake slab and cut it it to fit on the bottom of the silicone cupcake mold.  Then, they make a small coil they attach the bottom of that pancake.  This will keep the top from sliding out of the bottom.

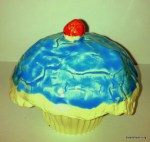
On the top of their pancake, students can design the top of the cupcake. Demonstrate several methods to design the top. Students choose what they want to do.  Demonstrate a large coil, a pinch pot you can carve away at, and how to pinch up the top to design it how you choose. Some kids add cherries, candles or even little figurines. Tell them they can add anything, as long as they slip and score properly. Most do a great job at this, however, keep an eye out for very detailed cupcakes – check attached objects before they get too dry.

Underglazes can be applied to the greenware – while the cupcakes are still wet. Look carefully at the indications on your glazes. After the cupcakes dry, they can be fired and will be complete. If you first have them dried and bisque fired, a second day will be required for glazing. Have the students paint the bottoms white or unglazed this gives the cupcakes a uniform look when they are displayed together.  Then have the students glaze the tops.
For the design, tell the students to please choose a color scheme, instead of making it look like a rainbow exploded on the cupcake! It helps them plan our their design better and make them look a little more refined. You may want to limit to 4 colors.

You can display the items or send them home and display pictures of the cupcakes.

As an alternate project, how fun would it be to see ceramic doughnuts, pizza, cake slices or even sushi! Younger grades benefit from very directed work where they all make the same thing. Older grades can learn about the artist and be freed to make whatever food they like. Have them sketch out their ideas before they begin sculpting.

Grade Level: 4th Grade

Art Skills: Slip and Score, Coil, Pinch, Molding, Glazing

It would be helpful to have multiple volunteers for this one – mostly to help the kids slip and score so any pieces the kids would like to attach stay on.

Materials:

Two 1/4 pound balls of clay for each student

cups of slip

forks for scoring

silicone cupcake molds

various glazes

brushes for glazing

Advertisement

Leave a Reply

Fill in your details below or click an icon to log in:

WordPress.com Logo

You are commenting using your WordPress.com account. Log Out /  Change )

Facebook photo

You are commenting using your Facebook account. Log Out /  Change )

Connecting to %s